|
INTRODUCTION
|
||||||||||||||||||||||
|
|
||||||||||||||||||||||
| Product Description | ||||||||||||||||||||||
| With the advance
of digital technologies, more and more hand-held devices employ the compact
sized digital media for data storage. There are several card-sized storage
media with different interface specifications available on the market.
Among which the most widely used are CompactFlash? Card, IBM Microdrive?,
SmartMedia? Card, Secure Digital? (SD) Card, MultiMediaCard?, Memory Stick
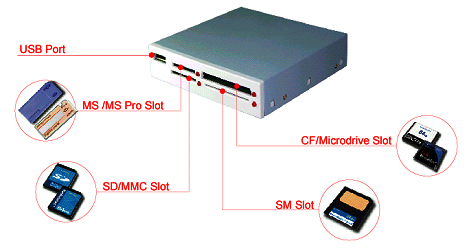
and Memory Stick PRO. The Internal Multi-Card Reader/Writer (or simplified as "Card Reader") is a universal card read/write device that allows you to access all those storage media as listed above without adopting any additional adapter to insert them into the device. It brings you the convenience of data transferring between your PC and other personal electronic devices. Besides to support the memory cards listed above, Card Reader is equipped with one USB port in the front of the panel for easy connection of any USB device. Package Contents Internal Card
Reader/Writer
|
||||||||||||||||||||||
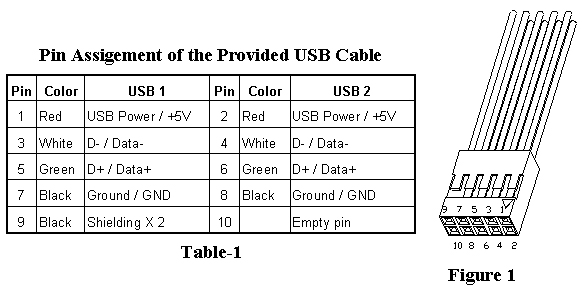
The provided USB cable has 9 color wires (see Figure 1), its pin assignment and corresponding wire color are shown in Table-1:
|
||||||||||||||||||||||
|
||||||||||||||||||||||
Software
Setup
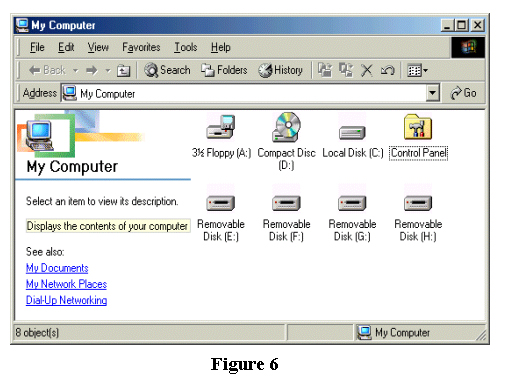
In Windows ME/XP Versions of Windows Me and Windows XP operating systems support drivers for the Card Reader and therefore no additional device drivers are required. After completed the hardware setup and restart your PC, 4 icons of "Removable Disk" will be displayed on the screen of "My Computer" indicating that the Card Reader is ready for use.
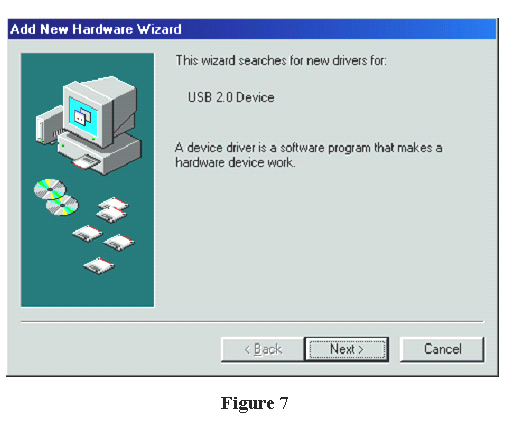
In Windows 98 1. Plug the Internal Card Reader into the USB port on your motherboard. 2. The window of "Add New Hardware Wizard" will pop up on the screen. 3. Locate the where the location of driver 4. Click "Next" in the "Add New Hardware Wizard" window. 5. Follow the on-screen instructions to complete the installation. 6. Double-click the icon of "My Computer" on the desktop; four icons of "Removable Disk" will be displayed on the screen of "My Computer" indicating that the Card Reader is ready for use.
In Windows 2000 Note: DO NOT plug the Card Reader to the USB port before you start the following installation processes. 1. Unzip the files in the ICR-A2.zip; find the program "Install.exe" under the directory of \Windows\Win2K. 2. Double click "Install.exe" to begin the installation, the setup wizard will guide you step by step to complete the installation. 3. Then go into the hardware setup (as described in Hardware Setup). 4. Restart yout PC. 5. Four icons of "Removable Disk" will be displayed on the screen of "My Computer" indicating that the Card Reader is ready for use
Illustration
Light (LED) indicators The LED indicators are beside the slots for each memory card. Lightening of the LED shows different operation status as follows:
Memory Card Slots There are four memory card slots located on the front side of the Card Reader. You can insert any type of memory cards listed on below to the corresponding slot for data exchange. The computer will treat those cards inserted to the card slots as "removable disks." USB port There is one USB port located on the front side of the Card Reader. Simply plug any USB device to the port to communicate with your PC. Icon of this USB device will be displayed on the screen of "My Computer" indicating this device is connected to your PC. |
||||||||||||||||||||||